OpenBSD 6.2 on BeagleBone Black
BeagleBone Black
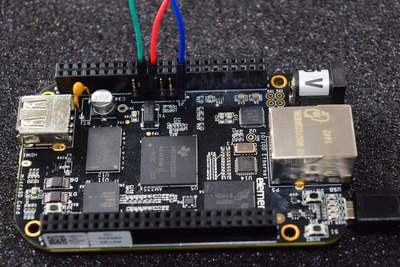
The BeagleBone Black is an Arm-7 development board with a AM335x 1GHz ARM Cortex-A8processor, 512 Mb DDR3 RAM, ethernet, microD slot, 4GB 8-bit eMMC on-board flash storage and a lof other nice goodies. This board is capable of running OpenBSD :)
In order to install OpenBSD on this board, you will need to access the serial console. This is a 3.3 Volt RS232 serial console, and connecting this with a 12 or even 5 Volt serial port will be fatal for the board. You need an USB F-cable to connect the BeagleBone Black serial port to your laptop or computer.
Connecting the Serial Port
Locate the pins of the serial board on the BeagleBone Black. The white dot is next to pin 1.
Use the following pins:
- pin 1: Ground
- pin 4: Receive
- pin 5: Transmit

USB F-cable connected to the serial console
I connected the other end (with the USB-connector) with a Debian Linux laptop and started minicom. In minicom, choose for
- Baud 115,200
- Bits 8
- Parity N
- Stop Bits 1
- Handshake None
Boot the board and check that you see the startup-messages.
Bring the board down.
OpenBSD Installation image
For the BeagleBone Black you need the miniroot-am335x-62.fs installfile from one of the OpenBSD ftp-mirrors.
You can copy this file with dd to a micro SD-card. I did this on a Debian Linux laptop with:
dd if=miniroot-am335x-62.fs of=/dev/mmcblk0 bs=16k
Funny thing is that you can use the same micro SD-card to install OpenBSD on :)
So you dd the install image to a micro SD-card, start the installer from there and install OpenBSD on the same card...
Get the sets
This step is optional, just to make things easier.
I downloaded the setfiles from one of the OpenBSD ftp-mirrors:
- base62.tgz
- BOOTARM.EFI
- bsd
- bsd.rd
- BUILDINFO
- comp62.tgz
- index.txt
- man62.tgz
- SHA256
- SHA256.sig
I put these files on a local webserver, so during the install the installation program can fetch these files from the local network.
I didn't bother to download any x-sets, this board will be running headless.
Start the installer
Now the hard work is done. Put the micro SD-card in the slot on the board. Locate the small switch on to top-side of the board, close to the micro SD-card slot (on the bottom-side). Keep this switch pressed while putting power on the board. The board will now attempt to install from the external micro SD-card and not from the internal eMMC-flash storage.
The OpenBSD installer will start. Just follow the installation procedure, At the choice which hard disk to partition, choose sd0. Because this BeagleBone will mount its /home as memory file system I choose for edit the partition table, removed the home partition and changed the size of the /usr partition.
After the installation is done reboot.
Reboot into the installed system
After the reboot, login again via the serial cable and have a look around your fresh OpenBSD system.
Protect the micro SD card by mounting it readonly
To protect the life of the SD-card, we are going to make it readonly.
Make sure your network configuration is right, ssh is hardened and your ~/.ssh/authorized_keys has the right contents.
Make a directory /proto and copy /var and /home to it.
mkdir /proto
cp -rp /var /proto
cp -rp /home /proto
Now, create a template for /dev
mkdir /proto/dev
cd /proto/dev
cp /dev/MAKEDEV .
./MAKEDEV all
Now edit /etc/fstab, comment the entries for /dev, /var and /home out and make the other entries readonly with noatime option:
4d0dfa46d94a8430.b none swap sw
4d0dfa46d94a8430.a / ffs ro,noatime 1 1
4d0dfa46d94a8430.d /usr ffs rw,wxallowed,nodev 1 2
swap /dev mfs rw,nosuid,noexec,-P=/proto/dev,-i=128,-s=4096 0 0
swap /var mfs rw,nosuid,noexec,-P=/proto/var,-s=8192 0 0
swap /home mfs rw,nosuid,noexec,-P=/proto/home,-s=8192 0 0
swap /tmp mfs rw,nosuid,noexec,-s=8192 0 0
Above, 4d0dfa46d94a8430 is the uuid of the micro SD-card.
Each of the last four lines will make a memory file system (MFS) and, for /dev, /var and /home populate that with the corresponding subdirectory from the /proto directory.
Reboot and check everything works fine.
Remounting read/write
In case you want to make some changes. install additional stuff, etc. you can remount a partition by:
mount -uw /
In this case / gets remounted read-write.
Harden ssh
I prefer to use public key authentication so I changed the /etc/ssh/sshd_config.
Don't forget that at boot time, your /home directory will be
populated from the /proto directory, so put your public key not only
in ~/.ssh/authorized_keys but also in /proto/home/<username>.ssh/<username>/authorized_keys otherwise you
will be able to log into your Beaglebone Black after the next
reboot.
Packages
Normally, the packages directory at the OpenBSD-servers ends with the architecture name. However, on ftp.eu.openbsd.org there is a directory pub/OpenBSD/6.2/packages/arm (not arm7).
Normally, on OpenBSD systems I put the following line in /root/.profile:
export PKG_PATHhttp://ftp.eu.openbsd.org/pub/OpenBSD/`uname -r`/packages/`uname -m`/
In this case this will not work, you have to manually change the last part. On my Beaglebone Black I have this entry in /root/.profile:
export PKG_PATH=http://ftp.eu.openbsd.org/pub/OpenBSD/`uname -r`/packages/arm/
In order to test this, I did a pkg_add gopher. After installing:
# file gopher
gopher: ELF 32-bit LSB shared object, ARM, version 1
As a normal (non-root) user I started gopher, and it works :)
Resources
The following pages where helpful during the installation of OpenBSD 6.2 on the BeagleBone Black:
- OpenBSD on BeagleBone Black Everything I wish I knew before installing the newly renamed armv7 port on a BeagleBone Black by Ted Unangst
- Running OpenBSD off a USB Stick by Volker Roth
- OpenBSD on Soekris by John Hart
100% made with ♥ by a human — no cookies, no trackers.
Proud member of the 250kb.club,
the no-JS.club,
the Blogroll.Club,
and the Bukmark.Club.
Don’t let a billionaire’s algorithm control what you read — use an RSS feed reader.
Most recent pages All tags Sitemap RSS of Gophersite
